Sensory Art Recipe!

Good morning! To start off the week we are sharing another super fun, easy peasy two-step art experiment by Alice Turkel! This is another recipe that ties in science, as kiddos can create and play with everyone’s favorite non-newtonian fluid, Oobleck!

AliceT_OobleckProject

Share your Oobleck experiments with us on Facebook, or tag us on Instagram @maudmorganarts!

Mount Pressed Plants Like a Botanist

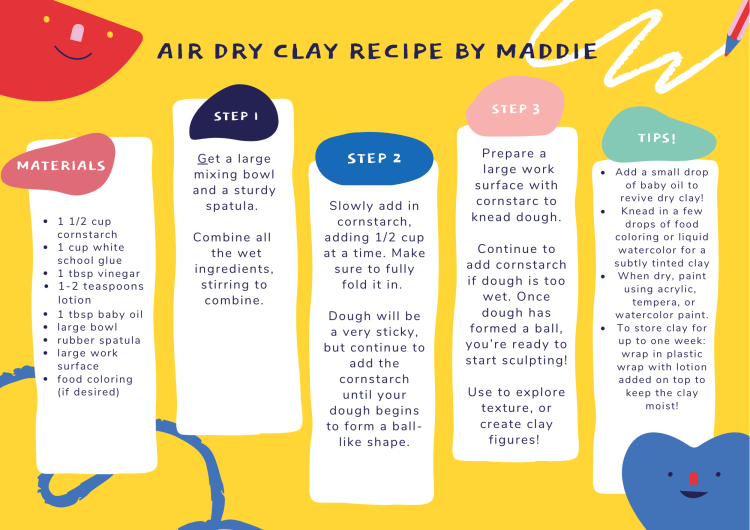
Greetings Everyone! As the weather warms up it is the perfect time to follow-up to the project posted on April 7th; Making a Plant Press by MMA instructor, Andrew Goulet. Below are Andrew’s step-by-step plans for mounting the pressed plants you collected!

Screen Shot 2020-04-01 at 1.04.43 PM

So you went out and collected some plants, assembled your plant press, and patiently waited a few days for them to dry. Now it’s time for the fun part! Pressing is a method of preserving plants for later study by drying them completely. In order to catalog each plant, botanists mount specimens on paper and write down any information that could be useful later, such as the location and date it was collected.
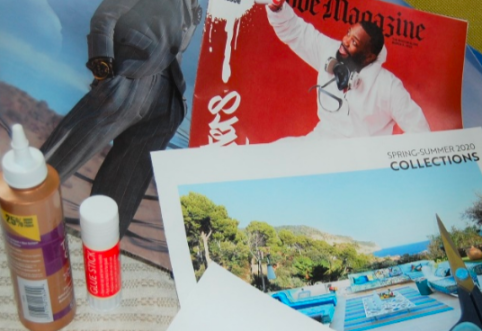
What you’ll need:

Screen Shot 2020-04-01 at 1.07.00 PM

      • Paper (preferably cardstock or coverstock)
      • Glue (I used Mod Podge, but any clear drying glue will do)
      • Toothpick
      • Scissors
      • Pencil


Step 1:
Open your press and carefully remove your specimens. They should be dry and flat.

Screen Shot 2020-04-01 at 1.11.20 PM

Step 2:
Arrange specimens on a blank piece of paper. If some leaves have fallen off during the pressing process, you can arrange them around the plant.

Screen Shot 2020-04-01 at 1.11.29 PM

Step 3:
Flip the plants over and apply small dollops of glue to the backside of the leaves and along any thick stems.

Screen Shot 2020-04-01 at 1.11.36 PM    Screen Shot 2020-04-01 at 1.11.44 PM

Step 4:
Flip the plant back over and gently press and hold down where the glue was applied for a few seconds, or until the glue has started to set.

Tip: If your specimen has a bulky stem or a thin stem that is hard to glue, cut a thin strip of paper and glue it across the stem like a strap.

Step 5:
Once you have mounted your specimen, it’s ready to be labeled. Here is an example of the information you might want to record:

Screen Shot 2020-04-01 at 1.16.08 PM

            • Common name
            • Scientific name
            • Where it was collected
            • The habitat it was collected in
            • Who collected it
            • Date collected


Once your specimens are mounted you can frame them, scan them, put them in an album or scrapbook. They make great gifts or even cards. Or, if you want to do as a botanist would, store them face-up in a dry place for later study.


This one is for all the sculpture fans

Homemade. Air. Dry. Clay! I didn’t know this was possible until MMA’s Kindergarten Instructor Maddie Massicotte emailed us a recipe to share! Gamechanger!

If your little ones – or yourself – have been missing the tactile feel of clay, and have been itching to make some 3D art work, give the below recipe a go!

AirDryClay_MaddieM

Share your air dry clay creations with us on Instagram by tagging @maudmorganarts! Or connection with us on Facebook!

Selfie Enhancement

Good day, Everyone! Looking for a fun and creative way to do some artistic self reflection? For a modern take on a self portrait, try out this project by MMA Children’s Instructor, Kinga Borondy!

Screen Shot 2020-03-31 at 9.12.11 AM

For this project you’ll need:

  • A printed photograph of someone’s face, either your own or a friends or relatives
  • Colored papers: Junk mail, wrapping paper, old greeting cards, magazines, catalogues,
  • Newspaper
  • Scissors
  • Glue

Step 1:

Glue the photo to a larger piece of paper; you can use cardstock, a stiff mailer or the back of an old cereal box, just make it large enough to glue paper around the picture.

Screen Shot 2020-03-31 at 9.12.20 AM

Step 2:

Enhance the “selfie” images using paper materials, markers, crayons or paint.

See Kinga’s selfie examples below:

Screen Shot 2020-03-31 at 9.14.47 AM

Screen Shot 2020-03-31 at 9.14.41 AM

Notes from Kinga: I picked both a black and white photograph and a color photograph. I surrounded the B&W photo with colored papers and the color photo with newsprint. I liked using just the cut papers.

Thanks for sharing, Kinga! This project really has endless possibilities and will create a beautiful piece of reflective self expression! Feel free to share and tell us about your Enhanced Selfie by tagging us @maudmorganarts on Instagram!